Tag Archives: option of the week

Append data to the URL query

A new curl option was born: --url-query.

How it started

curl offered the -d / --data option already in its first release back in 1998. curl 4.0. A trusted old friend.

curl also has some companion versions of this option that work slightly differently, but they all have the common feature that they append data to the the request body. Put simply: with these options users construct the body contents to POST. Very useful and powerful. Still today one of the most commonly used curl options, for apparent reasons.

curl -d name=mrsmith -d color=blue https://example.com

Convert to query

A few years into curl’s lifetime, in 2001, we introduced the -G / --get option. This option let you use -d to create a data set, but the data is not sent as a POST body anymore but is instead converted to a query string and used in a GET request.

curl -G -d name=mrsmith -d color=blue https://example.com

This would make curl send a GET request to this URL: https://example.com/?name=mrsmith&color=blue

The “query” is the part of the URL that sits on the right side of the question mark (but before the fragment that if it exists starts with the first # following the question mark).

URL-encode

In 2008 we added --data-urlencode which made it even easier for users and scripts to use these options correctly as now curl itself can URL-encode the given data instead of relying on the user to do it. Previously, script authors would have to do that encoding before passing the data to curl which was tedious and error prone. This feature also works in combination with -G of course.

How about both?

The -d options family make a POST. The -G converts it to a GET.

If you want convenient curl command line options to both make content to send in the POST body and to create query parameters in the URL you were however out of luck. You would then have to go back to use -d but handcraft and encode the query parameters “manually”.

Until curl 7.87.0. Due to ship on December 21, 2022. (this commit)

--url-query is your new friend

This is curl’s 249th command line option and it lets you append parameters to the query part of the given URL, using the same syntax as --data-urlencode uses.

Using this, a user can now conveniently create a POST request body and at the same time add a set of query parameters for the URL which the request uses.

A basic example that sends the same POST body and URL query:

curl -d name=mrsmith -d color=blue --url-query name=mrsmith --url-query color=blue https://example.com

Syntax

I told you it uses the data-urlencode syntax, but let me remind you how that works. You use --url-query [data] where [data] can be provided using these different ways:

contentThis will make curl URL-encode the content and pass that on. Just be careful so that the content does not contain any = or @ symbols, as that will then make the syntax match one of the other cases below!
=contentThis will make curl URL-encode the content and pass that on. The preceding = symbol is not included in the data.
name=contentThis will make curl URL-encode the content part and pass that on. Note that the name part is expected to be URL-encoded already.
@filenameThis will make curl load data from the given file (including any newlines), URL-encode that data and pass it on in the POST.
name@filenameThis will make curl load data from the given file (including any newlines), URL-encode that data and pass it on in the POST. The name part gets an equal sign appended, resulting in name=urlencoded-file-content. Note that the name is expected to be URL-encoded already.
+contentThe data is provided as-is unencoded

For each new --url-query, curl will insert an ampersand (&) between the parts it adds to the query.

Replaces -G

This new friend we call --url-query makes -G rather pointless, as this is a more powerful option that does everything -G ever did and a lot more. We will of course still keep -G supported and working. Because that is how we work.

A boring fact of life is that new versions of curl trickle out into the world rather slowly to ordinary users. Because of this, we can be certain that scripts and users all over will need to keep using -G for yet another undefined period of time.

Trace

Finally: remember that if you want curl to show you what it sends in a POST request, the normal -v / --verbose does not suffice as it will not show you the request body. You then rather need to use --trace or --trace-ascii.

convert a curl cmdline to libcurl source code

The dash-dash-libcurl is the sometimes missed curl gem that you might want to know about and occasionally maybe even use.

How do I convert

There is a very common pattern in curl land: a user who is writing an application using language L first does something successfully with the curl command line tool and then the person wants to convert that command line into the program they are writing.

How do you convert this curl command line into a transfer using programming language XYZ?

Language bindings

There is a huge amount of available bindings for libcurl. Bindings, as in adjustments and glue code for languages to use libcurl for Internet transfers so that they do not have to write the application in C.

At a recent count I found more than 60 libcurl bindings. They allow authors of virtually any programming language to do internet transfers using the powers of libcurl.

Most of these bindings are “thin” and follow the same style of the original C API: You create a handle for which you set options and then you do the transfer. This way they are fairly easy to keep up to date with the always-changing and always-improving libcurl releases.

Say hi to --libcurl

Most curl command line options are mapped one-to-one to an underlying libcurl option so for some time I tried to help users by explaining what they map to. Until one day I realized that

Hey! curl itself already has this mapping in source code, it just needs a way to show it to users!

How would it best output this mapping?

The --libcurl command line option was added to curl already back in 2007 and has been part of the tool since version 7.16.1.

Show this command line as libcurl code

It is really easy to use too.

  1. Create a complicated curl command line that does what you need it to do.
  2. Append --libcurl example.c to the command line and run it again.
  3. Inspect your newly generated file example.c for how you could write your application to do the same thing with libcurl.

If you want to use a libcurl binding rather than the C API, like perhaps write your code in Python or PHP, you need to convert the example code into your programming language but much thanks to the options keeping their names across the different bindings it is usually a trivial task.

Example

The simplest possible command line:

curl curl.se

It gets HTTP from the site “curl.se”. If you try it, you will not see anything because it just replies with a redirect to the HTTPS version of the page. But ignoring that, you can convert that action into a libcurl program like this:

curl curl.se --libcurl code.c

The newly created file code.c now contains a program that you can compile :

gcc -o getit code.c -lcurl

and then run

./getit

You might want your program to rather follow the redirect? Maybe even show debug output? Let’s rerun the command line and get a code update:

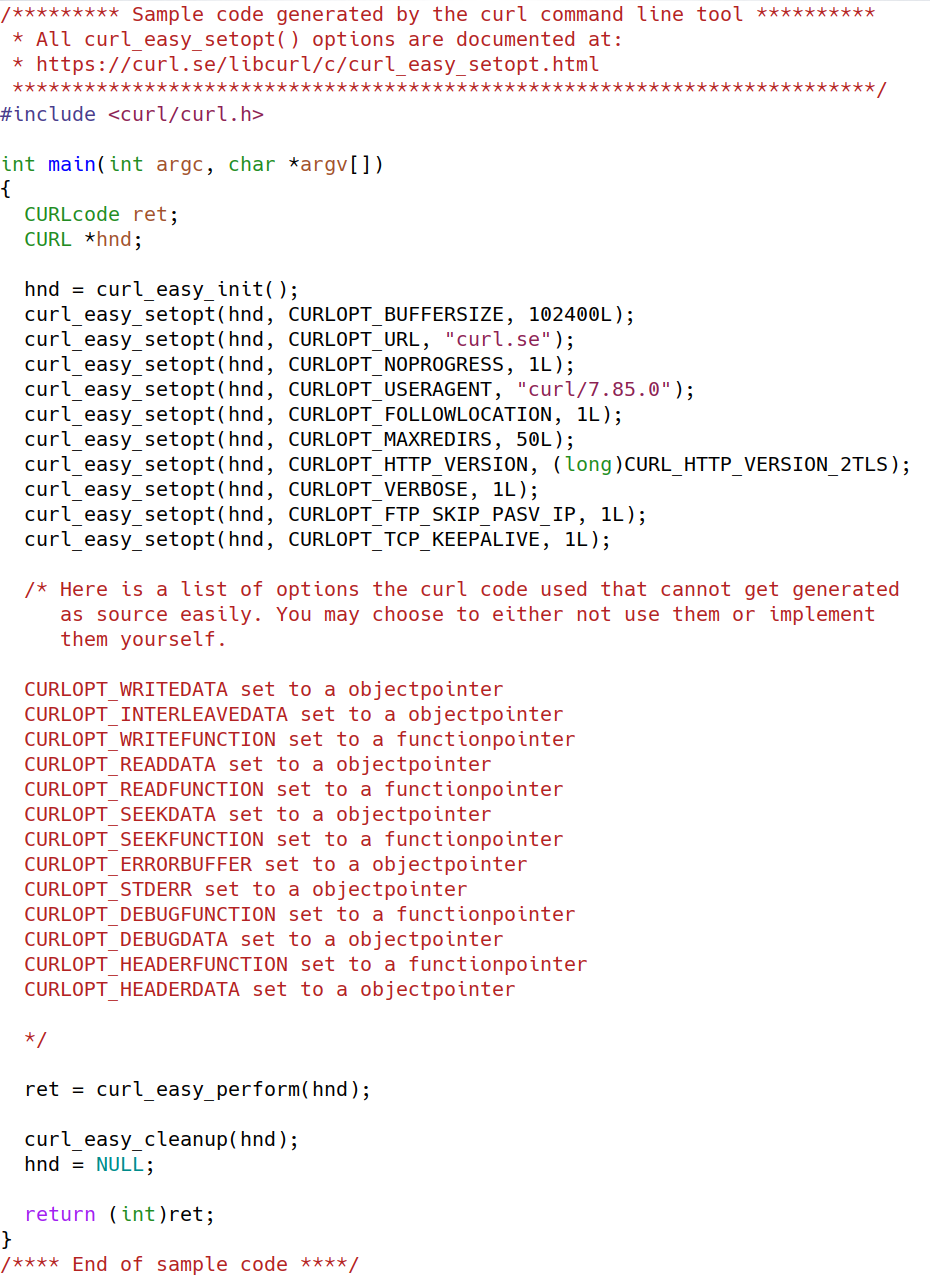
curl curl.se --verbose --location --libcurl code.c

Now, if you rebuild your program and run it again, it shows you the front page HTML of the curl website on stdout.

The code

The exact code my curl version 7.85.0 produced in the command line above is shown below.

You see several options that are commented out. Those were used by the command line tool but there is no easy or convenient way to show their use in the example. Often you can start out by just skipping those .

store the curl output over there

tldr: --output-dir [directory] comes in curl 7.73.0

The curl options to store the contents of a URL into a local file, -o (--output) and -O (--remote-name) were part of curl 4.0, the first ever release, already in March 1998.

Even though we often get to hear from users that they can’t remember which of the letter O’s to use, they’ve worked exactly the same for over twenty years. I believe the biggest reason why they’re hard to keep apart is because of other tools that use similar options for maybe not identical functionality so a command line cowboy really needs to remember the exact combination of tool and -o type.

Later on, we also brought -J to further complicate things. See below.

Let’s take a look at what these options do before we get into the new stuff:

--output [file]

This tells curl to store the downloaded contents in that given file. You can specify the file as a local file name for the current directory or you can specify the full path. Example, store the the HTML from example.org in "/tmp/foo":

curl -o /tmp/foo https://example.org

--remote-name

This option is probably much better known as its short form: -O (upper case letter o).

This tells curl to store the downloaded contents in a file name name that is extracted from the given URL’s path part. For example, if you download the URL "https://example.com/pancakes.jpg" users often think that saving that using the local file name “pancakes.jpg” is a good idea. -O does that for you. Example:

curl -O https://example.com/pancakes.jpg

The name is extracted from the given URL. Even if you tell curl to follow redirects, which then may go to URLs using different file names, the selected local file name is the one in the original URL. This way you know before you invoke the command which file name it will get.

--remote-header-name

This option is commonly used as -J (upper case letter j) and needs to be set in combination with --remote-name.

This makes curl parse incoming HTTP response headers to check for a Content-Disposition: header, and if one is present attempt to parse a file name out of it and then use that file name when saving the content.

This then naturally makes it impossible for a user to be really sure what file name it will end up with. You leave the decision entirely to the server. curl will make an effort to not overwrite any existing local file when doing this, and to reduce risks curl will always cut off any provided directory path from that file name.

Example download of the pancake image again, but allow the server to set the local file name:

curl -OJ https://example.com/pancakes.jpg

(it has been said that “-OJ is a killer feature” but I can’t take any credit for having come up with that.)

Which directory

So in particular with -O, with or without -J, the file is download in the current working directory. If you want the download to be put somewhere special, you had to first ‘cd’ there.

When saving multiple URLs within a single curl invocation using -O, storing those in different directories would thus be impossible as you can only cd between curl invokes.

Introducing --output-dir

In curl 7.73.0, we introduce this new command line option --output-dir that goes well together with all these output options. It tells curl in which directory to create the file. If you want to download the pancake image, and put it in $HOME/tmp no matter which your current directory is:

curl -O --output-dir $HOME/tmp https://example.com/pancakes.jpg

And if you allow the server to select the file name but still want it in $HOME/tmp

curl -OJ --output-dir $HOME/tmp https://example.com/pancakes.jpg

Create the directory!

This new option also goes well in combination with --create-dirs, so you can specify a non-existing directory with --output-dir and have curl create it for the download and then store the file in there:

curl --create-dirs -O --output-dir /tmp/receipes https://example.com/pancakes.jpg

Ships in 7.73.0

This new option comes in curl 7.73.0. It is curl’s 233rd command line option.

You can always find the man page description of the option on the curl website.

Credits

I (Daniel) wrote the code, docs and tests for this feature.

Image by Alexas_Fotos from Pixabay

curl ootw: –path-as-is

Previous options of the week.

--path-as-is is a boolean option that was added in curl 7.42.0.

Path normalization in URLs

I hope it isn’t a surprise to you that curl works on URLs. It’s one of the fundamental pillars of curl. The “URLs” curl work with are actually called “URIs” in the IETF specs and the primary specification for them is RFC 3986. (But also: my URL is not your URL…)

A URL can be split up into several different components, which is typically done by the “URL parser” in a program like curl. For example , we can identify a scheme, a host name and a path.

When a program is given a URL, and the program has identified the path part of that URL – it is supposed to “Remove Dot Segments” (to use the wording from RFC 3986) before that path is used.

Remove Dot Segments

Let me show you this with an example to make it clear. Ponder that you pass this URL to curl: "https://example.org/hello/../to/../your/../file". Those funny dot-dot sequences in there is traditional directory traversal speak for “one directory up”, while a single "./" means in the same directory.

RFC 3986 says these sequences should be removed, so curl will iterate and remove them accordingly. A sequence like "word/../" will effectively evaluate to nothing. The example URL above will be massaged into the final version: "https://example.org/file" and so curl will ask the server for just /file.

Compare the HTTP requests

Seen as pure HTTP 1.1, the result of the command line used without --path-as-is:

GET /file HTTP/1.1
Host: example.org
user-agent: curl/7.71.0
accept: */*

Same command line, with --path-as-is:

GET /hello/../to/../your/../file HTTP/1.1
Host: example.org
user-agent: curl/7.71.1
accept: */*

Trick thy server

HTTP servers have over the years been found to have errors and mistakes in how they handle paths and a common way to exploit such flaws has been to pass on exactly this kind of dot-dot sequences to servers.

The very minute curl started removing these sequences (as the spec tells us) security researcher objected and asked for ways to tell curl to not do this. Enter --path-as-is. Use this option to make curl send the path exactly as provided in the URL, without removing any dot segments.

Related options

Other curl options that allow you to customize HTTP request details include --header, --request and --request-target.

curl ootw: –silent

Previous options of the week.

--silent (-s) existed in curl already in the first ever version released: 4.0.

Silent by default

I’ve always enjoyed the principles of Unix command line tool philosophy and I’ve tried to stay true to them in the design and implementation of the curl command line tool: everything is a pipe, don’t “speak” more than necessary by default.

As a result of the latter guideline, curl features the --verbose option if you prefer it to talk and explain more about what’s going on. By default – when everything is fine – it doesn’t speak much extra.

Initially: two things were “spoken”

To show users that something is happening during a command line invoke that takes a long time, we added a “progress meter” display. But since you can also ask curl to output text or data in the terminal, curl has logic to automatically switch off the progress meter display to avoid content output to get mixed with it.

Of course we very quickly figured out that there are also other use cases where the progress meter was annoying so we needed to offer a way to shut it off. To keep silent! --silent was the obvious choice for option name and -s was conveniently still available.

The other thing that curl “speaks” by default is the error message. If curl fails to perform the transfer or operation as asked to, it will output a single line message about it when it is done, and then return an error code.

When we added an option called --silent to make curl be truly silent, we also made it hush the error message. curl still returns an error code, so shell scripts and similar environments that invoke curl can still detect errors perfectly fine. Just possibly slightly less human friendly.

But I want my errors?

In May 1999, the tool was just fourteen months old, we added --show-error (-S) for users that wanted to curl to be quiet in general but still wanted to see the error message in case it failed. The -Ss combination has been commonly used ever since.

More information added

Over time we’ve made the tool more complex and we’ve felt that it needs some more informational output in some cases. For example, when you use --retry, curl will say something that it will try again etc. The reason is of course that --verbose is really verbose so its not really the way to ask for such little extra helpful info.

Only shut off the progress meter

Not too long ago, we ended up with a new situation where the --silent option is a bit too silent since it also disables the text for retry etc so what if you just want to shut off the progress meter?

--no-progress-meter was added for that, which thus is a modern replacement for --silent in many cases.

curl ootw: –remote-time

Previous command line options of the week.

--remote-time is a boolean flag using the -R short option. This option was added to curl 7.9 back in September 2001.

Downloading a file

One of the most basic curl use cases is “downloading a file”. When the URL identifies a specific remote resource and the command line transfers the data of that resource to the local file system:

curl https://example.com/file -O

This command line will then copy every single byte of that file and create a duplicated resource locally – with a time stamp using the current time. Having this time stamp as a default seems natural as it was created just now and it makes it work fine with other options such as --time-cond.

Use the remote file’s time stamp please

There are times when you rather want the download to get the exact same modification date and time as the remote file has. We made --remote-time do that.

By adding this command line option, curl will figure out the exact date and time of the remote file and set that same time stamp on the file it creates locally.

This option works with several protocols, including FTP, but there are and will be many situations in which curl cannot figure out the remote time – sometimes simply because the server won’t tell – and then curl will simply not be able to copy the time stamp and it will instead keep the current date and time.

Not be default

This option is not by default because.

  1. curl mimics known tools like cp which creates a new file stamp by default.
  2. For some protocols it requires an extra operation which then can be avoided if the time stamp isn’t actually used for anything.

Combine this with…

As mentioned briefly above, the --remote-time command line option can be really useful to combine with the --time-cond flag. An example of a practical use case for this is a command line that you can invoke repeatedly, but only downloads the new file in case it was updated remotely since the previous time it was downloaded! Like this:

curl --remote-name --time-cond cacert.pem https://curl.haxx.se/ca/cacert.pem

This particular example comes from the curl’s CA extract web page and downloads the latest Mozilla CA store as a PEM file.

curl ootw: –connect-timeout

Previous options of the week.

--connect-timeout [seconds] was added in curl 7.7 and has no short option version. The number of seconds for this option can (since 7.32.0) be specified using decimals, like 2.345.

How long to allow something to take?

curl shipped with support for the -m option already from the start. That limits the total time a user allows the entire curl operation to spend.

However, if you’re about to do a large file transfer and you don’t know how fast the network will be so how do you know how long time to allow the operation to take? In a lot of of situations, you then end up basically adding a huge margin. Like:

This operation usually takes 10 minutes, but what if everything is super overloaded at the time, let’s allow it 120 minutes to complete.

Nothing really wrong with that, but sometimes you end up noticing that something in the network or the remote server just dropped the packets and the connection wouldn’t even complete the TCP handshake within the given time allowance.

If you want your shell script to loop and try again on errors, spending 120 minutes for every lap makes it a very slow operation. Maybe there’s a better way?

Introducing the connect timeout

To help combat this problem, the --connect-timeout is a way to “stage” the timeout. This option sets the maximum time curl is allowed to spend on setting up the connection. That involves resolving the host name, connecting TCP and doing the TLS handshake. If curl hasn’t reached its “established connection” state before the connect timeout limit has been reached, the transfer will be aborted and an error is returned.

This way, you can for example allow the connect procedure to take no more than 21 seconds, but then allow the rest of the transfer to go on for a total of 120 minutes if the transfer just happens to be terribly slow.

Like this:

curl --connect-timeout 21 --max-time 7200 https://example.com

Sub-second

You can even set the connection timeout to be less than a second (with the exception of some special builds that aren’t very common) with the use of decimals.

Require the connection to be established within 650 milliseconds:

curl --connect-timeout 0.650 https://example.com

Just note that DNS, TCP and the local network conditions etc at the moment you run this command line may vary greatly, so maybe restricting the connection time a lot will have the effect that it sometimes aborts a connection a little too easily. Just beware.

A connection that stalls

If you prefer a way to detect and abort transfers that stall after a while (but maybe long before the maximum timeout is reached), you might want to look into using –limit-speed.

Also, if a connection goes down to zero bytes/second for a period of time, as in it doesn’t send any data at all, and you still want your connection and transfer to survive that, you might want to make sure that you have your –keepalive-time set correctly.

curl ootw: –ftp-skip-pasv-ip

(Other command line options of the week.)

--ftp-skip-pasv-ip has no short option and it was added to curl in 7.14.2.

Crash course in FTP

Remember how FTP is this special protocol for which we create two connections? One for the “control” where we send commands and read responses and then a second one for the actual data transfer.

When setting up the second connection, there are two ways to do it: the active way and the passive way. The wording there is basically in the eyes of the FTP server: should the server be active or passive in the creation and that’s the key. The traditional underlying FTP commands to do this is either PORT or PASV.

Due to the prevalence of firewalls and other network “complications” these days, the passive style is dominant for FTP. That’s when the client asks the server to listen on a new port (by issuing the PASV command) and then the client connects to the server with a second connection.

The PASV response

When a server responds to a PASV command that the client sends to it, it sends back an IPv4 address and a port number for the client to connect to – in a rather arcane way that looks like this:

227 Entering Passive Mode (192,168,0,1,156,64)

This says the server listens to the IPv4 address 192.168.0.1 on port 40000 (== 156 x 256 + 64).

However, sometimes the server itself isn’t perfectly aware of what IP address it actually is accessible as “from the outside”. Maybe there’s a NAT involved somewhere, maybe there are even more than one NAT between the client and the server.

We know better

For the cases when the server responds with a crazy address, curl can be told to ignore the address in the response and instead assume that the IP address used for the control connection will in fact work for the data connection as well – this is generally true and has actually become even more certain over time as FTP servers these days typically never return a different IP address for PASV.

Enter the “we know better than you” option --ftp-skip-pasv-ip.

What about IPv6 you might ask

The PASV command, as explained above, is explicitly only working with IPv4 as it talks about numerical IPv4 addresses. FTP was actually first described in the early 1970s, quite a lot time before IPv6 was born.

When FTP got support for IPv6, another command was introduced as a PASV replacement.: the EPSV command. If you run curl with -v (verbose mode) when doing FTP transfers, you will see that curl does indeed first try to use EPSV before it eventually falls back and tries PASV if the previous command doesn’t work.

The response to the EPSV command doesn’t even include an IP address but then it always assumes the same address as the control connection and it only returns back a TCP port number.

Example

Download a file from that server giving you a crazy PASV response:

curl --ftp-skip-pasv-ip ftp://example.com/file.txt

Related options

Change to active FTP mode with --ftp-port, switch off EPSV attempts with --disable-epsv.

curl ootw: –socks5

(Previous option of the week posts.)

--socks5 was added to curl back in 7.18.0. It takes an argument and that argument is the host name (and port number) of your SOCKS5 proxy server. There is no short option version.

Proxy

A proxy, often called a forward proxy in the context of clients, is a server that the client needs to connect to in order to reach its destination. A middle man/server that we use to get us what we want. There are many kinds of proxies. SOCKS is one of the proxy protocols curl supports.

SOCKS

SOCKS is a really old proxy protocol. SOCKS4 is the predecessor protocol version to SOCKS5. curl supports both and the newer version of these two, SOCKS5, is documented in RFC 1928 dated 1996! And yes: they are typically written exactly like this, without any space between the word SOCKS and the version number 4 or 5.

One of the more known services that still use SOCKS is Tor. When you want to reach services on Tor, or the web through Tor, you run the client on your machine or local network and you connect to that over SOCKS5.

Which one resolves the host name

One peculiarity with SOCKS is that it can do the name resolving of the target server either in the client or have it done by the proxy. Both alternatives exists for both SOCKS versions. For SOCKS4, a SOCKS4a version was created that has the proxy resolve the host name and for SOCKS5, which is really the topic of today, the protocol has an option that lets the client pass on the IP address or the host name of the target server.

The --socks5 option makes curl itself resolve the name. You’d instead use --socks5-hostname if you want the proxy to resolve it.

--proxy

The --socks5 option is basically considered obsolete since curl 7.21.7. This is because starting in that release, you can now specify the proxy protocol directly in the string that you specify the proxy host name and port number with already. The server you specify with --proxy. If you use a socks5:// scheme, curl will go with SOCKS5 with local name resolve but if you instead use socks5h:// it will pick SOCKS5 with proxy-resolved host name.

SOCKS authentication

A SOCKS5 proxy can also be setup to require authentication, so you might also have to specify name and password in the --proxy string, or set separately with --proxy-user. Or with GSSAPI, so curl also supports --socks5-gssapi and friends.

Examples

Fetch HTTPS from example.com over the SOCKS5 proxy at socks5.example.org port 1080. Remember that –socks5 implies that curl resolves the host name itself and passes the address to to use to the proxy.

curl --socks5 socks5.example.org:1080 https://example.com/

Or download FTP over the SOCKS5 proxy at socks5.example port 9999:

curl --socks5 socks5.example:9999 ftp://ftp.example.com/SECRET

Useful trick!

A very useful trick that involves a SOCKS proxy is the ability OpenSSH has to create a SOCKS tunnel for us. If you sit at your friends house, you can open a SOCKS proxy to your home machine and access the network via that. Like this. First invoke ssh, login to your home machine and ask it to setup a SOCKS proxy:

ssh -D 8080 user@home.example.com

Then tell curl (or your browser, or both) to use this new SOCKS proxy when you want to access the Internet:

curl --socks5 localhost:8080 https:///www.example.net/

This will effectively hide all your Internet traffic from your friends snooping and instead pass it all through your encrypted ssh tunnel.

Related options

As already mentioned above, --proxy is typically the preferred option these days to set the proxy. But --socks5-hostname is there too and the related --socks4 and --sock4a.

curl ootw: –range

--range or -r for short. As the name implies, this option is for doing “range requests”. This flag was available already in the first curl release ever: version 4.0. This option requires an extra argument specifying the specific requested range. Read on the learn how!

What exactly is a range request?

Get a part of the remote resource

Maybe you have downloaded only a part of a remote file, or maybe you’re only interested in getting a fraction of a huge remote resource. Those are two situations in which you might want your internet transfer client to ask the server to only transfer parts of the remote resource back to you.

Let’s say you’ve tried to download a 32GB file (let’s call it a huge file) from a slow server on the other side of the world and when you only had 794 bytes left to transfer, the connection broke and the transfer was aborted. The transfer took a very long time and you prefer not to just restart it from the beginning and yet, with many file formats those final 794 bytes are critical and the content cannot be handled without them.

We need those final 794 bytes! Enter range requests.

With range requests, you can tell curl exactly what byte range to ask for from the server. “Give us bytes 12345-12567” or “give us the last 794 bytes”. Like this:

curl --range 12345-12567 https://example.com/

and:

curl --range -794 https://example.com/

This works with curl with several different protocols: HTTP(S), FTP(S) and SFTP. With HTTP(S), you can even be more fancy and ask for multiple ranges in the same request. Maybe you want the three sections of the resource?

curl --range 0-1000,2000-3000,4000-5000 https://example.com/

Let me again emphasize that this multi-range feature only exists for HTTP(S) with curl and not with the other protocols, and the reason is quite simply that HTTP provides this by itself and we haven’t felt motivated enough to implement it for the other protocols.

Not always that easy

The description above is for when everything is fine and easy. But as you know, life is rarely that easy and straight forward as we want it to be and nether is the --range option. Primarily because of this very important detail:

Range support in HTTP is optional.

It means that when curl asks for a particular byte range to be returned, the server might not obey or care and instead it delivers the whole thing anyway. As a client we can detect this refusal, since a range response has a special HTTP response code (206) which won’t be used if the entire thing is sent back – but that’s often of little use if you really want to get the remaining bytes of a larger resource out of which you already have most downloaded since before.

One reason it is optional for HTTP and why many sites and pages in the wild refuse range requests is that those sites and pages generate contend on demand, dynamically. If we ask for a byte range from a static file on disk in the server offering a byte range is easy. But if the document is instead the result of lots of scripts and dynamic content being generated uniquely in the server-side at the time of each request, it isn’t.

HTTP 416 Range Not Satisfiable

If you ask for a range that is outside of what the server can provide, it will respond with a 416 response code. Let’s say for example you download a complete 200 byte resource and then you ask that server for the range 200-202 – you’ll get a 416 back because 200 bytes are index 0-199 so there’s nothing available at byte index 200 and beyond.

HTTP other ranges

--range for HTTP content implies “byte ranges”. There’s this theoretical support for other units of ranges in HTTP but that’s not supported by curl and in fact is not widely used over the Internet. Byte ranges are complicated enough!

Related command line options

curl also offers the --continue-at (-C) option which is a perhaps more user-friendly way to resume transfers without the user having to specify the exact byte range and handle data concatenation etc.